Square and PayPal are payment service providers, or PSPs, that help small businesses accept payments in person and online. PayPal may be better for small businesses with an international customer base, but if price is a priority for you, Square may be your winner. Here’s how the two companies compare. » MORE: NerdWallet’s best POS systems…
The article Square vs. PayPal: Which Is Right for Your Business? originally appeared on NerdWallet.
Concept maps provide a visual and user-friendly way of showing relationships between various concepts or ideas. Frequently used in business, design, engineering, marketing, and academia, concept maps are one of the most popular organizational tools out there.
When you’re running a business, developing a new product, or devising growth strategies, you inevitably have a lot of information to collate and analyze. However, this information isn’t distinct and isolated. Instead, it is interconnected with other aspects of the activity.
If you are designing a new product, for example, you’ll need to incorporate information regarding your target audiences, buyer personas, budgets, and marketing campaigns. You will need this information as you decide which features are most important.
A concept map provides a visual and user-friendly way of presenting this information. It shows the relationships between various concepts or ideas. Frequently used in business, design, engineering, marketing, and academia, the widespread application of concept maps makes them one of the most popular organizational tools out there.
To find out which form of concept mapping is best suited to your needs, look at these four types of concept maps now.
1. Spider Map
A spider map gets its name because when complete, it looks like a typical spider’s web. You’ll place a central topic or concept in the center of the map, with relevant subtopics surrounding it in a radial pattern. If necessary, each subtopic can then branch off into smaller subtopics.
If you have a single central concept, a spider map can be an easy and efficient way to visualize the topic and surrounding subtopics. However, it can be restrictive if you have numerous core concepts to include. Furthermore, a standard spider map doesn’t allow for adding much detail regarding the relationships between subtopics. This can be a limitation if you want to incorporate more in-depth data into your concept map.
As the name suggests, a hierarchy map shows the order of things or concepts, starting at the top. You place the most important entry at the top of the map. Then, your map branches off into several different levels, decreasing in importance the further down they are.
For example, you might begin with a core topic at the top of a hierarchy map. Next, you would place overarching principles on the next level, subtopics on the following level, and so on. At each interval, you can add branches or lines to include content that’s relevant to that particular entry.
If you want to prioritize items in order of importance or chronology, a hierarchy map can be an effective way of concept mapping. However, it may only show limited information regarding the interdependence or relationship between lower-level entries.
3. System Map
When it comes to concept mapping, a system map is certainly the most detailed tool to use. At first glance, a system map can seem confusing and overwhelming. But if you look a little closer you’ll be surprised at how easy to navigate it is.
Every entry connects with relevant entries by way of a line and a plus or minus sign. This indicates whether or not it has a positive or negative effect upon the entry. This makes it easy to identify and understand the relationships between topics and subtopics.
As system maps can contain a vast of information, they are often the most effective way to incorporate all the data you need into a visual formation. Due to this, they are extremely popular and widely used. This is particularly true in a business setting when large amounts of data and the relationships between different teams and departments need to be referenced.
4. Flow Chart
A flow chart is a simple yet effective form of concept mapping that can streamline decision-making. This type of concept map can make it easy to reach a conclusion. Starting with a central question or topic, you move through the chart according to your own input. If you answer “yes” to your core question, for example, you’ll follow the relevant line to the next entry. Then repeat this process until you reach a conclusion.
With a flow chart, the information is quite orderly and easy to read and interpret. However, flow charts rarely contain large amounts of data, which can limit their effectiveness. In addition, they’re typically used when established steps or processes are already in place. They are not useful for facilitating critical thinking or problem solving.
Using These Important Tools in Business
Concept mapping can be used in a wide variety of situations, but it is particularly useful in a business environment. If you want to research a potential business idea, plan an upcoming marketing campaign, or learn more about a target audience, for example, a concept map can help you to present your ideas and/or findings visually. It can help you to understand the relationships between each entry on the map.
Of course, using concept maps effectively is the key to success. Therefore, it’s worth doing your research and learning how to create these maps. With the right tools and methodologies, concept maps can become a critical element of your data analysis and decision-making processes.
In today’s business landscape, many recent graduates are seeking alternative solutions to the ongoing dilemma brought about by a global pandemic. Altogether too many professionals are being displaced because of shut-down restrictions, vaccination mandates and a whole host of other issues including, but not limited to, corporate downsizing. If you are a recent college grad […]
In today’s business world, the involvement of software and digital systems is at its highest level. Irrespective of the type of business, it is required to integrate standardized information technology systems within their business to help improve productivity level and expand their radius. Moreover, with the involvement of detailed productivity-enhancing software, the overall increase in […]
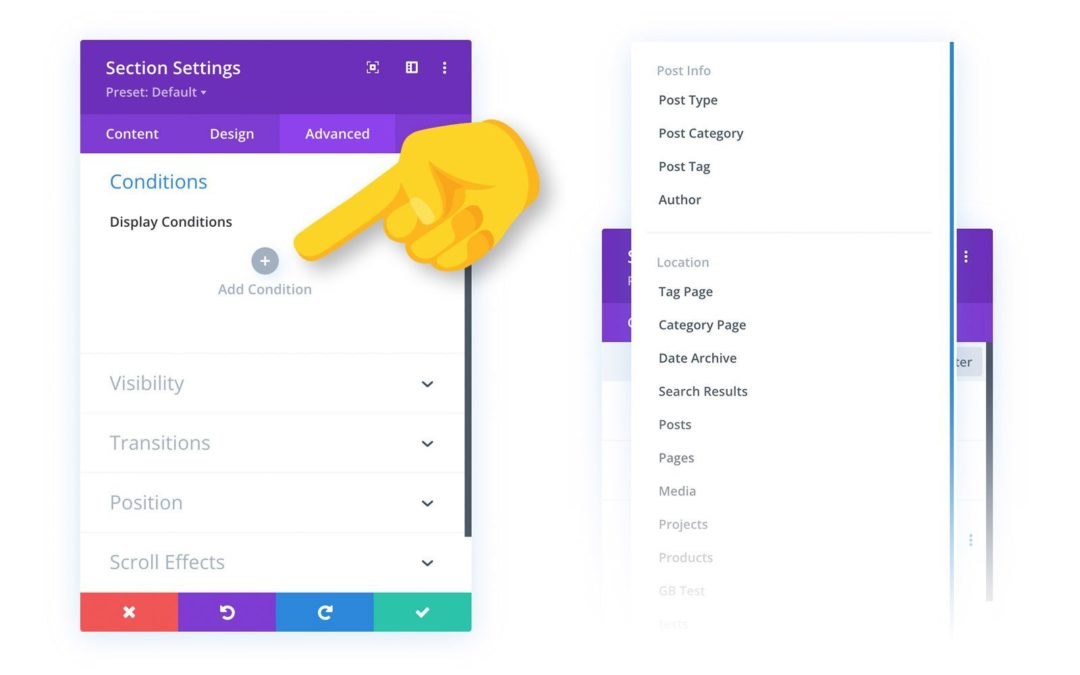
Easily Create Advanced Visibility Rules For Any Element
Today we are excited to release a new set of condition options for Divi that allow you to apply advanced display logic to any module, row or section, hiding or displaying elements based on a set of conditions that you define, such as user role, date and time, post information, website location and more. For example, you can enable floating promotional banners that automatically appear at the start of a sale, and disappear at the end of a sale. You can display unique content to users when they log in, and unique elements to specific users based on their user role. Divi comes with a wide range of conditions and so many unique ways to use them, so let’s dig in and explore the details of this powerful new feature.
How To Use The New Condition Options
You will notice a new Conditions option group in the Advanced tab of the Divi settings pop-up. Here, you can add new conditions that will control an element’s visibility. If your conditions are met, the element will be displayed for your visitors. If not, it will remain hidden. You can add multiple conditions too create advanced rulesets, and you can choose to display the element based on whether all or one of your conditions are met.
Condition Options Examples
There are so many unique ways to use Divi’s Condition Options! Here are a few examples that highlight just three of Divi’s many conditions.
Date & Time: Creating A Recurring Promotional Banner
You can use Divi’s condition options to display elements based on date and time, and even create recurring content schedules. In this example, I am building a website for a Pizzeria. The Pizzeria likes to celebrate “Pizza Fridays” by running a “buy one Pizza, get one free” promotion every Friday, and they want everyone who visits the website on Fridays to know about it.
To promote the sale, I created a floating promo bar and fixed it to the top of the browser using Divi’s position options. Next, I used Divi’s animation options to make it slide in when someone visits the page, so they are sure to take notice!
It looks perfect, but we don’t want this promo bar to be visible unless it’s Friday. That’s where Divi’s new condition options come in. I can add the “Date & Time” condition and chose to only display this banner on Fridays. Now the website owners can set it and forget it, and just watch their customers get excited about their weekly free pizza.
Logged In Status: Creating A Paid Online Publication
Divi’s condition options can be used to display specific content to logged-in users. In this example, I am building a website for an ad-free publication that is supported by paying customers who get exclusive access to certain articles. We need to display the full article to only paying subscribers. Everyone else will get a preview and the option to join. You have probably seen websites like this before, and we can recreate it easily in Divi!
I’ve set up a clever section that masks the article’s content when non-subscribers scroll down the page using a gradient background and Divi’s scroll effects. This section blocks the article content and asks visitors to log in or become a subscriber. I only want this section to show up for logged out users. That’s where Divi’s condition options come in!
I can use the “Logged In Status” condition type and choose to display this element only when the visitor is logged out. I can also use condition options to hide the full content of the article. To put it all together, when you’re logged out and not a paying subscriber, the full article content is hidden and a content masking section is displayed. Once a paying subscriber logs in, the full content is revealed and the content mask goes away.
Cart Contents: Capturing Abandoned Carts In WooCommerce
Divi’s condition options also come with some unique integrations for WooCommerce. In this example, I want to incentivize conversions by offering a coupon code to customers who have abandoned their cart while it’s still filled with products.
I created a floating popup to promote a coupon code, and I used Divi’s position options to fix the section to the bottom of the browser. It looks great, but I only want this popup to appear when someone abandons their cart. That’s where Divi’s condition options come in!
I can add the “Cart Contents” condition and configure it to display only when products exist in a customer’s cart. I also want to make sure that we don’t show this coupon code right away, but instead, only show it to customers who have abandoned their cart during checkout. I can use the “Page Visit” condition, and only show this popup to customers who have visited the WooCommerce Checkout page.
Now, when someone adds products to their cart, goes to check out, but gets cold feet before paying, the next time they visit the website they’ll see this 20% off coupon code, and I bet that will seal the deal!
Divi comes with tons of condition options to choose from. Furthermore, each condition contains different sub-options that expand the scope of the condition for different scenarios. These conditions can also be combined to create advanced visibility rulesets.
User Status
Uses status conditions allow you to tailor your website to your visitors based on whether or not they are logged on, and the WordPress user role assigned to their account.
Logged In Status – Hide or display elements based on whether or not the current visitors is logged in or logged out.
User Role – Hide or display elements based on a user’s role. For example, display paid content to specific customers or private content to certain subscribers.
Interaction
Interaction conditions allow you to tailor content to your visitors based on how or when they interact with your website.
Date & Time – Hide or display elements based on date and time. Creating recurring schedules or display content for a finite block of time. For example, display event information for an upcoming event, or display a promotional banner only when a sale is active.
Page/Post Visit – Hide and display elements to users who have or have not visited specific pages on your website. Retarget visitors on your own website with unique content based on the way the interact with your website.
Product Purchase – Hide or display elements to users who have or have not purchased specific products from your WooCommerce store.
Cart Contents – Hide or display elements based on whether or not a user has items in their WooCommerce cart. Target all products or specific products in your store.
Number Of Views – Hide or display an element based on how many times it has been viewed by a visitor. Create limited-time content that expires after a certain amount of time based on visitor engagement.
Device
Device conditions allow you to tailor your website to our visitors based on the software they are using to browse your website.
Browser – Hide or display elements to users based on the type of browser they are using. Tailor your design to specific browser to handle on the unique ways certain browsers deal with CSS, or offer content that is specific to certain browsers (like browser extensions).
Operating System – Hide or display elements to users based on which operating system they are using. For example, you could create download links to your software that provides the user with the correct installation file.
Cookie – Hide or display elements based on the existence or the values of certain cookies stored in the visitor’s browser. This gives you lots of freedom to customize pages for specific users based on how they have interacted with your website and its plugins.
Post Information
Post Information conditions allow you to display elements based on the post’s meta information, such as it’s category, tag, author and type. These conditions can be combined with Theme Builder template assignments, giving you two layers of conditions and the ability to create more dynamic layouts.
Post Type – Hide or display elements on posts of a specific type.
Post Category – Hide or display elements on posts within specific categories.
Post Tag – Hide or display elements on posts with specific tags.
Author – Hide or display elements on posts written by specific authors.
Website Location
Website Location conditions allow you to display elements based on where the page exists on your website. These conditions can be combined with Theme Builder template assignments, giving you two layers of conditions and the ability to create more dynamic layouts.
Tag Page – Hide or display elements on specific tag pages.
Category Page – Hide or display elements on specific category pages.
Date Archive – Hide or display elements on specific date archives pages.
Search Results – Hide or display elements on search result pages based on the terms being searched by the visitor.
Post Types – Hide or display elements on specific post types.
Posts/Pages – Hide or display elements on specific posts or pages that you select from a list.
Divi Condition Options Are Available Today!
Divi’s new condition options are available today, so download Divi and take them for a spin! Let us know what you think in the comments and don’t forget to check back soon for even more great Divi features coming your way
Join Or Upgrade Today For 10% Off!
Today's The Best Day To Get Divi Or Upgrade Your Account To Lifetime
Join the most enthusiastic and loving WordPress theme community on the web and download Divi today. Using the new Visual Builder, you can build websites faster than ever before with its incredibly fast and intuitive visual interface. You have to see it to believe it!