Almost every WordPress website uses plugins. While they are certainly handy, they can occasionally cause your website to malfunction or present security issues. If that happens, you may need to disable them one by one until you find the cause of the problem. Which can be difficult if you don’t have access to your dashboard because a plugin malfunctioned.
Fortunately, there are plenty of other ways you can disable your WordPress plugins, such as through your database. In this article, we’re going to talk about why you might need to do this and teach you how it works in three steps.
Let’s get to it!
Why Would You Want to Disable a WordPress Plugin?
As we said above, the primary reasons that someone would disable a WordPress plugin is to troubleshoot or prevent malfunctions or security issues. Sometimes those have already occurred, and sometimes its preventative.
However, depending on the circumstances, your dashboard might be inaccessible. Or you’re getting an error code that you don’t quite know how to troubleshoot or what’s causing it. Take error codes 502 and 504, for example. You’ve probably come across both several times and while they’re not unique to WordPress, issues with plugins is a potential cause. Aside from those, if you ever run into a problem where a plugin doesn’t work as intended or one of your website’s features appears to be broken, it’s a good idea to test for compatibility issues.
First thing when issues like this come up, disable your plugins one-by-one, not all at once. You can track down the problem exponentially faster this way (and prevent your site from getting even more broken). There are three ways for you to handle this deactivation:
- Through your dashboard, using the Plugins tab.
- Via FTP, by renaming your plugins’ folders.
- Directly from your database.
These three ways have been listed in order of easiest to most complex. Keep in mind that just because it’s complex doesn’t mean it’s hard. It just requires a bit more than a few clicks. Let’s dig in so that you can disable your WordPress plugins in every way imaginable.
1. How to Disable a WordPress Plugin from the Dashboard
Disabling a WordPress plugin through your admin dashboard is the easiest and simplest way to disable a plugin. If you have access to the dashboard, that is. If the plugin issues have caused you to lose access, move down and check out the SFTP or database methods. But if you’re able to login as normal, here’s what you can do.
First, navigate to Plugins – Installed from the left sidebar.
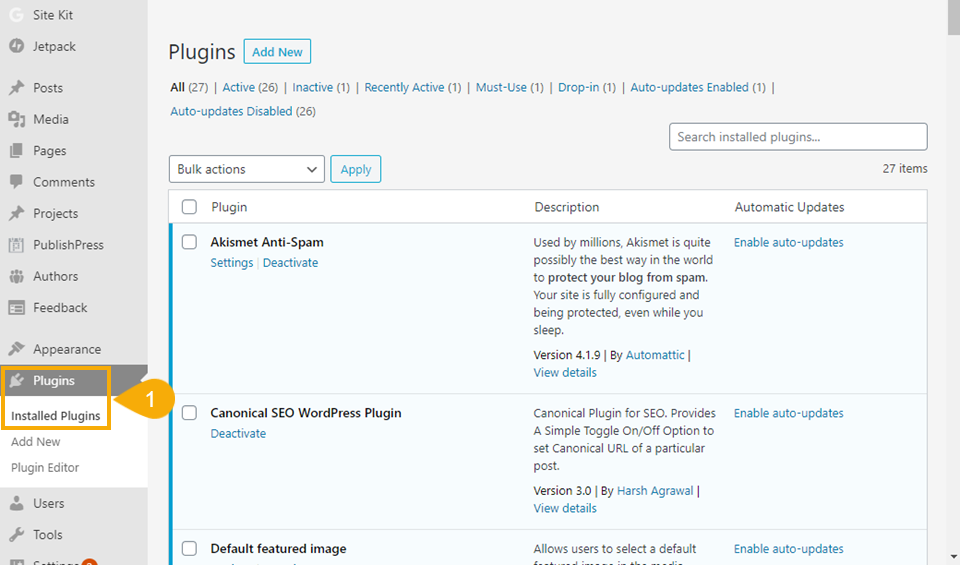
Once there, scroll to find whatever plugin you’re deactivating first. Remember, if you’re troubleshooting issues you think might be plugin related, deactivate them one-by-one. Do not do it all at once, remember. In terms of troubleshooting, that way lies madness.
When you click the Deactivate button beneath a plugin’s title, it will reload the page and the plugin will stop working.

You will also have the option to reactivate it or delete it (2) when that’s finished. If your problem continues, you’re fine to reactivate it. If not, the delete button removes it from your files and storage.
That’s it, though. You’ve disabled the plugin from your dashboard, and hopefully your problem is solved.
2. How to Disable a WordPress Plugin from the Database using phpMyAdmin
While accessing your WordPress database isn’t something everyone is comfortable with, if you are, disabling WordPress plugins this way is safe and secure.
Step #1: Access Your WordPress Database With phpMyAdmin
To get started, you’ll need access to your WordPress database. When you set up the platform, WordPress automatically creates a database where it stores all the information on your website. However, you can’t access your database from your dashboard. To get there, you’ll need to use a tool that enables you to interact with databases, such as phpMyAdmin.
Most web hosts these days provide you with a cPanel control panel when you sign up for a plan. If you access your control panel, you should see a section called Databases, with a phpMyAdmin option underneath:

Additionally, if you are on a host such as SiteGround or Pressable, you will be using a proprietary dashboard like Site Tools. In most cases, these have a section dedicated to databases. In Siteground, for instance, it is under Site – MySQL – phpMyAdmin (tab) – Access phpMyAdmin.
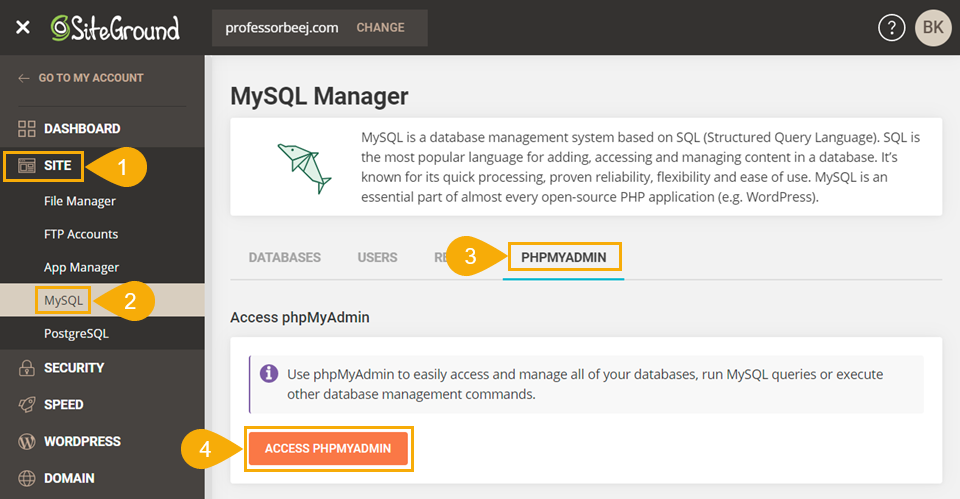
Regardless of how you get there or what host you use, phpMyAdmin is the same everywhere. After pressing the button or clicking the link, phpMyAdmin will open, and you’ll now see several options in the middle of the page. a navigation menu at the top, and a list of databases to the left. If you’re hosting a single website, you should see only one database on that list. In the example below, we’re using a test server with several websites, hence the multiple items to the left that can be expanded:

In most cases, you can identify WordPress databases due to the wp_ prefix. However, a lot of hosts change that default for security purposes and you can modify it too. In any case, click on your website’s database and then move on to step number two.
Step #2: Locate Your Plugin Tables
Once you open your database in phpMyAdmin, you’ll see a list of tables which contain all your website’s data, like the ones below:

You’ll notice some tables have names that make their contents easy to recognize, such as wp_options and wp_posts. However, there’s no dedicated table for plugins. Instead, WordPress stores your plugin information within the wp_options table:

Keep in mind – the tables you see in the examples above also have custom prefixes for security reasons. However, yours probably start with wp_. In any case, click on the wp_options link now and a new page will open, containing lots of rows:

The row we’re looking for is called active_plugins and that value shows up under the option_name column. If you don’t see it at first, don’t worry – there should be several pages of rows, so keep looking for it. Once you find it, move on to step number three.
Step #3: Disable Your WordPress Plugins
Here’s what the active_plugins row should look like once you find it:

To the right, you can see part of the value that row contains. Let’s go ahead and edit it by clicking on the Edit button to the far left of the row. On the next page, you’ll see all the fields the active_plugin row contains, including one called option_value. You can find a string that contains all your active plugins there, like this one:
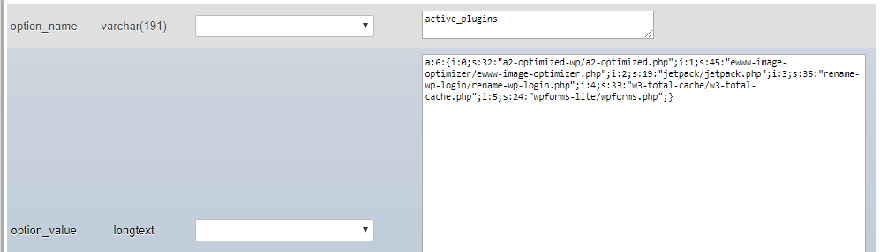
Before you make any changes, you should go ahead and copy that entire string to a text editor, then save that file somewhere where you won’t forget about it. That way, you can restore the original values of the option_value field in case something goes wrong.
After you do that, go ahead and delete all the contents of the field and replace them with this string:
a:0:{}
That small snippet of code tells WordPress there are zero active plugins on your website. In the example we showed you earlier, there were six plugins running, which is why it opened with an a:6 value instead. Once that’s done, hit the Go button at the lower right side of the page to save your changes.
Go ahead and try to open your WordPress website. If one of your plugins was preventing it from loading, it should be back to normal now. If so, you should be able to access your dashboard again. From here you can activate your plugins again, one by one. If your site break after you enable a plugin, you can be sure that this is the cause of your problems. You can return to your database and once again disable your plugins to bring your site back. You can then uninstall the broken plugin, and start looking for a replacement.
3. How to Deactivate a WordPress Plugin via SFTP
SFTP, or secure file-transfer protocol, is one of the safest ways to deactivate WordPress plugins. First, you will need an external FTP client. We will be using FileZilla.
Within your cPanel or Site Tools or site dashboard, you will be able to create FTP logins and credentials. In most cases, it’s very near where you create email addresses or access phpMyAdmin.
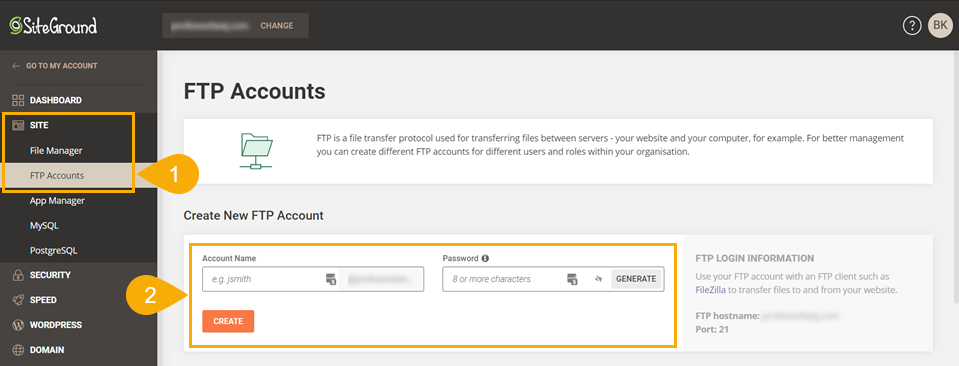
With that done, launch your FTP client and login using those credentials.

You can the Quickconnect (1) feature, which just lets you login without worrying about saving credentials or other options. The FTP client will now show your local computer in the panes to the left and the web host’s directory structure in the panes to the right.
Navigate to the /public-html/wp-content/plugins/ folder (2) of this WordPress installation and right-click it on the plugin’s folder that you intend to deactivate by SFTP (3). In the context menu, select Download (4). Downloading the plugin does not delete it off your server, but it backs it up just incase you need to reinstall it.
Once it’s backed up that way, you are okay to right-click again and choose Delete. Doing so will both deactivate and remove that plugin. Note that this method does not require you to perform a separate action to deactivate as in your dashboard. If you find that you need to re-enable the plugin, simply upload the backup that you downloaded first.
How to Disable All WordPress Plugins and Why You’d Want To
Sometimes, however, you will need to disable everything and start fresh. Maybe the plugins are conflicting with your theme, or multiple plugins are clashing with multiple other plugins and disabling them one-by-one just doesn’t help. Additionally, you might need to see which single plugins work on their own. So disabling all of them will grant you the opportunity to troubleshoot single plugins without interference from others.
Luckily, you can very easily disable all of your plugins at once just as easily as you can just one. With the best ways being via SFTP or the WordPress admin dashboard.
In the WP dashboard, go to Plugins – Installed just like above. This time, however, instead of selecting just one box, click the checkbox in the upper-left of the list. This will select every plugin on the list (1).

Then, click the dropdown menu (2) and choose Deactivate (3). You will then press the Apply button (4), and as the page reloads, all of the plugins are deactivated.
If you need to completely remove them and start fresh, you can repeat that process, only now you will select Delete (5) instead of deactivate.
If you’re using SFTP, the process is really similar to above, only you will select all of the folders to download/delete, instead of just 1.
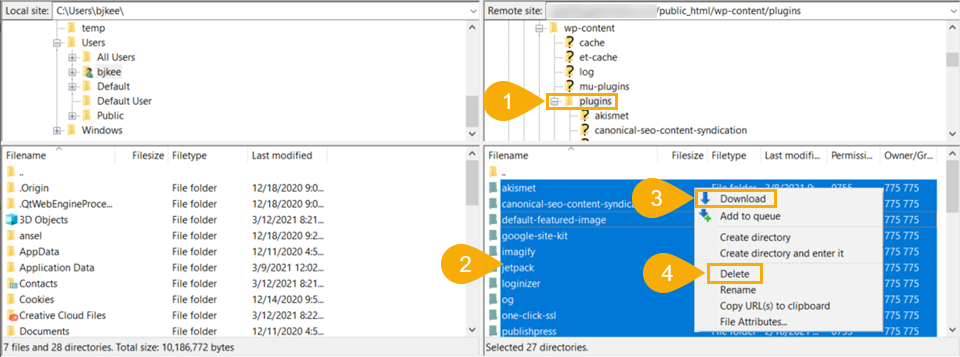
Again, navigate to /public_html/wp-content/plugins/ (1) and select all plugin subfolders (2) instead of a single one. Right-click and select Download (3) to maintain backups, and when those are finished, repeat the process and select Delete (4).
And once again, your entire plugin collection has been disabled, deactivated, and deleted.
Conclusion
Troubleshooting websites can be difficult. When it comes to WordPress, plugins can sometimes malfunction, and the only way to solve the problem is to temporarily disable them. Most times, using your admin panel makes the most sense. However, that can be tricky without access to your dashboard, so heading into your site’s file system via SFTP or into the WP core database is just as viable and almost as simple. Regardless of how you need to troubleshoot or why, these methods for deactivating your WordPress plugins should help sort things out.
Let us know about your experiences troubleshooting and deactivating WordPress plugins? Any tips or pointers?
Article featured image by Sammby / shutterstock.com
The post How to Disable/Deactivate WordPress Plugins (3 Methods) appeared first on Elegant Themes Blog.