In earlier versions of Divi, adding a gradient overlay to a parallax background image was not a built-in option. But, with Divi’s new background options (and the Gradient Builder), you can easily create beautiful parallax backgrounds with countless gradient overlay designs.
In this tutorial, we are going to show you how to use Divi’s background options to add a colorful gradient overlay that blends with a background image using both True and CSS Parallax methods.
Sneak Peek
Here is a quick look at the background designs we’ll build in this tutorial.
This first one has a gradient overlay with the Color blend mode used on the background image using the True Parallax method.
And here is the same design using the CSS Parallax Method. Notice that the gradient remains fixed/attached to the background image so that it appears to be a part of the actual image and not just a layer.
And here is an example of a gradient overlay using semi-transparent color stops without a blend mode.
The Concept
The basic idea of this design involves two steps:
1. Create a background gradient for a section using the gradient builder making sure to place the gradient above the background image.
2. Add a background image to the same section that uses one of the parallax methods and the Color blend mode.
This will allow the colorful gradient to overlay the parallax image while it moves when scrolling down the page. The Color blend mode merges the gradient overlay with the image for a beautiful image that looks great with parallax.
Download the Layout for FREE
To lay your hands on the designs from this tutorial, you will first need to download it using the button below. To gain
access to the download you will need to subscribe to our Divi Daily email list by using the form below. As a new
subscriber, you will receive even more Divi goodness and a free Divi Layout pack every Monday! If you’re already on the
list, simply enter your email address below and click download. You will not be “resubscribed” or receive extra emails.

To import the section layout to your Divi Library, do the following:
- Navigate to the Divi Library.
- Click the Import button at the top of the page.
- In the portability popup, select the import tab
- Choose the download file from your computer (make sure to unzip the file first and use the JSON file).
- Then click the import button.

Once done, the section layout will be available in the Divi Builder.
Let’s get to the tutorial, shall we?
What You Need to Get Started
To get started, you will need to do the following:
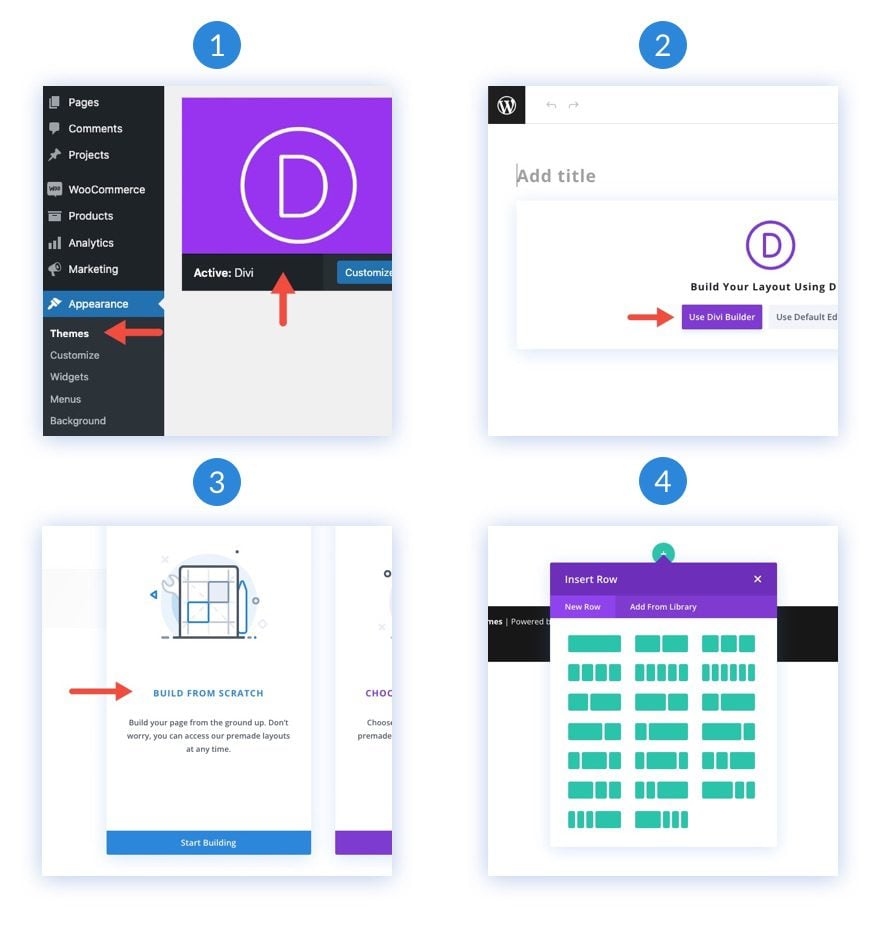
- If you haven’t yet, install and activate the Divi Theme.
- Create a new page in WordPress and use the Divi Builder to edit the page on the front end (visual builder).
- Choose the option “Build From Scratch”.
- Now have a blank canvas to start designing in Divi!
How to Create a Parallax Image Background with a Blended Gradient Overlay in Divi
1. Create the Fill-in Row and Heading Text
Although we are going to be focusing on the section background design for this tutorial, it makes sense to add a fill-in row and heading to get a better feel for what the design will look like in a normal use case.
To start things off, add a one-column row to the existing section in the builder.

Next, add a text module to the row/column.

Text Settings
Open the settings for the Text Module. Under the Content tab, add an H2 heading to the body content.
<h2>Say Hello to Divi</h2>
Under, the design tab, update the heading options and max width as follows:
- Heading 2 Font: Inter
- Heading 2 Font Weight: Bold
- Heading 2 Text Color: #fff
- Heading 2 Text Size: 8vw
- Heading 2 Line Height: 1.2em
- Heading 2 Text Shadow: see screenshot
- Headding 2 Text Shadow Blur Strength: 0.28em
- Heading 2 Text Shadow Color: #10076d
- Max Width: 50%

Row Settings
Now that the heading is in place, let’s update the row size and spacing to make it more responsive.
Open the row settings. Under the Design tab, update the following:
- Width: 100%
- Max Width: 80vw
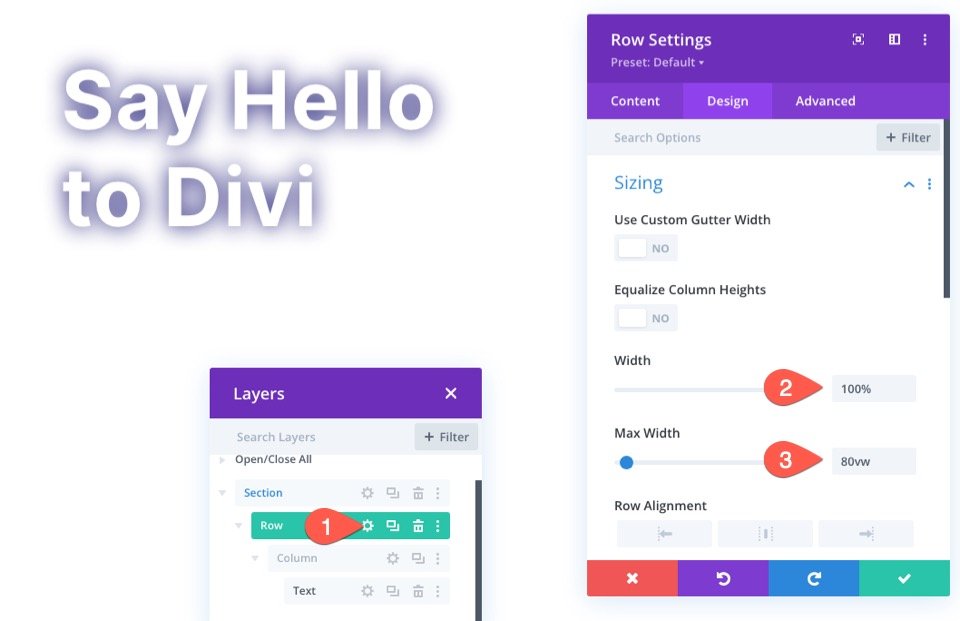
- Padding: 15vw top, 15vw bottom

2. Design the Gradient Background for the Section
Now that the fill-in content is complete, we are ready to start designing our section gradient background.
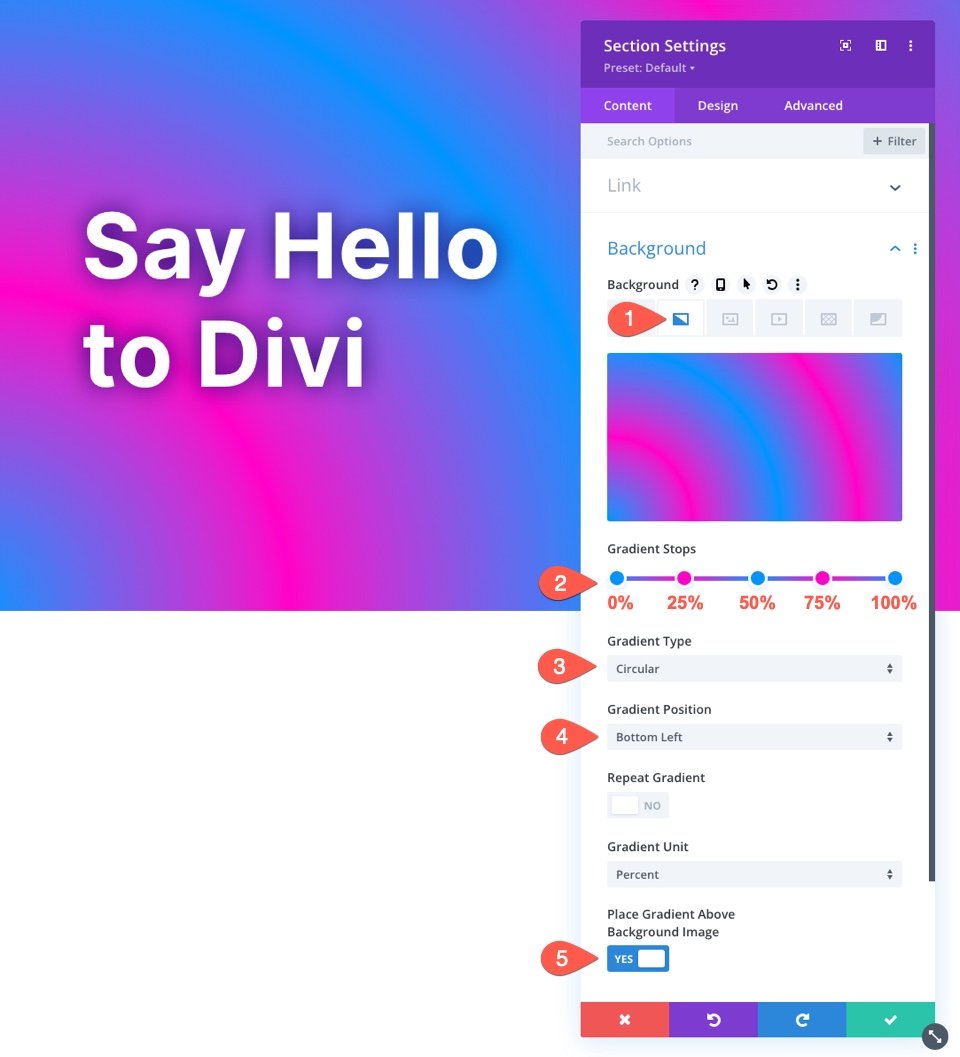
Background Gradient Settings
Open the settings for the section. Under the Content tab, select the gradient tab under the background options and update the gradient options as follows:
- Gradient Stop 1: #0094ff (at 0%)
- Gradient Stop 2: #ff00c7 (at 25%)
- Gradient Stop 3: #0094ff (at 50%)
- Gradient Stop 4: #ff00c7 (at 75%)
- Gradient Stop 5: #0094ff (at 100%)
- Gradient Type: Circular
- Gradient Position: Bottom Left
- Place Gradient Above Background Image: YES
3. Add a Parallax Background Image with Color Blend Mode
Once the gradient design is complete, we are ready to add our parallax background image. Then we will apply the Color blend mode to blend the gradient design with the background image for a beautiful parallax background design.
Background Image Settings
While in the background options of the section, select the Background Image tab and upload a background image. The update the following:
- Use Parallax Effect: YES
- Parallax Method: True Parallax
- Background Image Blend: Color

Why the Color Blend Mode?
The color blend mode blends a grayscale version of the image with the colors (hue and saturation) of the gradient. This preserves the visual quality of the image with a whole new color scheme.
4. Add a Background Mask (Why Not?)
To finish off the design, let’s add a background mask that will sit behind our heading to make the text pop a little more and emphasize the parallax effect.
Background Mask Settings
While in the background options of the section, select the Background Mask tab and update the following:
- Mask: Blades
- Mask Transform: Flip Horizontal, Invert
- Mask Size: Custom Size
- Mask Width: 72vw
- Mask Position: Top Right

5. Add Some Temporary Scrolling Space for Testing
Before we check out the final results, we need to add some space above and below our section so that we have sufficient scrolling space to see the parallax effect in action. To do this, simply add the following margin to the section:
- Margin: 80vh top, 80vh bottom
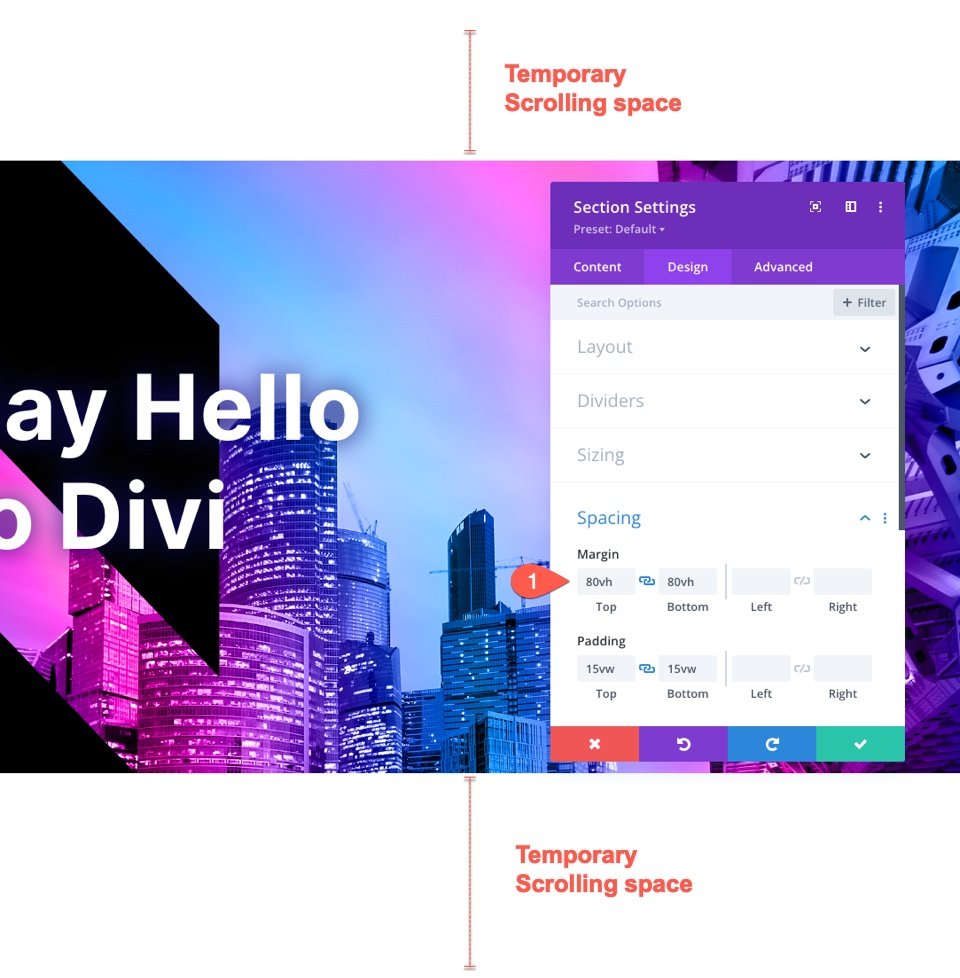
Don’t forget to remove this spacing when adding the section to your own page.
Final Results
Let’s take a look at the final result on a live page.
And here is the same design using the CSS Parallax Method. Notice that the gradient remains fixed/attached to the background image so that it appears to be a part of the actual image and not just a layer.
Using a Gradient Overlay without the Blend Mode
Although I love the blend mode for this design, you may feel the need for a more traditional gradient overlay for your parallax background image.
For example, you could choose not to add a blend mode to the design and simply give each of the gradient color stops a semi-transparent color. This would allow you to see a more subtle representation of the background image behind the gradient overlay.
To do this you could bring down the opacity of each color to something like 72% and then set the background image blend option back to Normal.

Here is an example of what this would look like.
Try More Gradients!
The Gradient Builder can create so many more colors and gradient types you can use to make these layered background designs stand out. You can check out our live demos of more background gradient design possibilities.
Final Thoughts
Creating a parallax background design with a blended gradient overlay can easily be done using Divi’s built-in background options. It really does give you the power of Photoshop in Divi like never before. Feel free to explore different color combinations with countless gradient color stops and positions. Plus, you can experiment with different blend modes as well.
Hopefully, this will come in handy for your own website or your next project.
I look forward to hearing from you in the comments.
Cheers!
.inline-code{padding: 0px 4px; color: crimson; font-family: Monaco,consolas,bitstream vera sans mono,courier new,Courier,monospace!important} video.with-border {border-radius: 8px;box-shadow: 0 8px 60px 0 rgba(103,151,255,.11), 0 12px 90px 0 rgba(103,151,255,.11);display:block;margin: 0 auto;}
The post How to Create a Parallax Image Background with a Blended Gradient Overlay in Divi appeared first on Elegant Themes Blog.